Monday, 27 August 2012
Saturday, 30 April 2011
Oracle BI EE 10.1.3.3/2 – Customizing look and feel – Styles and Skins – Phase 2
I had earlier blogged here on how to go about modifying the styles in BI EE. As i said earlier, a style controls how dashboards and answers are displayed to an end user at run time. Whereas Skins are assigned to an end user while logging in. Now lets see how to go about modifying the skins. This is again just to give you a guideline. If you go to the {OracleBI}/web/app/res folder, all the folders starting sk_ are the skin folders. If you have done a default install, you would find a folder under the name sk_oracle10. oracle10 is the default skin. Our aim is to modify the preview button in BI Answers i.e
Change this-> to this->
Lets make a copy of the sk_oracle10 folder in {OracleBI}/web/app/res and rename it to sk_oracle10modified. Copy this sk_oracle10modified to {OracleBI}/oc4j_bi/j2ee/home/applications/analytics/analytics/res folder. Remember, for both skins and styles, custom styles and skins must be present in both {OracleBI}/web/app/res and {OracleBI}/oc4j_bi/j2ee/home/applications/analytics/analytics/res folders. Now lets modify the image file_preview.gif under sk_oracle10modified/answers folder to our desired image. Remember the modification has to be made in both the folders. Once this is done, edit the instanceconfig.xml file under {OracleBIData}/web/config folder. Add the following tag to the file
DefaultSkin oracle10modified /DefaultSkin
Once this is done, restart your OC4J and presentation services. Now look at the answers preview button for a report. The preview image should have changed to your custom image.
Change this->
to this-> Lets make a copy of the sk_oracle10 folder in {OracleBI}/web/app/res and rename it to sk_oracle10modified. Copy this sk_oracle10modified to {OracleBI}/oc4j_bi/j2ee/home/applications/analytics/analytics/res folder. Remember, for both skins and styles, custom styles and skins must be present in both {OracleBI}/web/app/res and {OracleBI}/oc4j_bi/j2ee/home/applications/analytics/analytics/res folders. Now lets modify the image file_preview.gif under sk_oracle10modified/answers folder to our desired image. Remember the modification has to be made in both the folders. Once this is done, edit the instanceconfig.xml file under {OracleBIData}/web/config folder. Add the following tag to the file
DefaultSkin oracle10modified /DefaultSkin
Once this is done, restart your OC4J and presentation services. Now look at the answers preview button for a report. The preview image should have changed to your custom image.
Reset OC4J Admin Password
Seems like a rash of questions recently about how to reset Oracle Application Server/OC4J's administrator password and for whatever reason Google doesn't index our doc (as per the feedback below, due to our robot.txt disallowing this - I don't know why this is the policy) and as a result isn't finding the entry in our doc on how to do this here:
http://download-west.oracle.com/docs/cd/B31017_01/core.1013/b28940/trouble_asc.htm#BCEDHFEI
Reproduced in its entirety below [1] and hopefully this will help Google point people to the right information.
One of the "tricks" you have to be aware of when doing this is that if you are using Application Server Control to manage a cluster of OC4J's, there is a default assumption that all the OC4J's use the same administrator password (you can override) - if you are doing this, step 5 of the instructions, which talks about removing the ASControl cached security file (passwords encrypted!) to re-enable cluster management, is important to heed when you do this.
[1]
Reset the
oc4jadmin password using the following procedure while you are logged in as the user who installed the Oracle Application Server instance:- Stop OC4J and the Application Server Control.
Enter the following command in the Oracle home of the application server instance:
(UNIX) ORACLE_HOME/opmn/bin/opmnctl stopproc ias-component=OC4J (Windows) ORACLE_HOME\opmn\bin\opmnctl stopproc ias-component=OC4J - Locate and open the following file in a text editor:
(UNIX)ORACLE_HOME/j2ee/home/config/system-jazn-data.xml (Windows)ORACLE_HOME\j2ee\home\config\system-jazn-data.xml - Locate the line that defines the credentials property for the oc4j
adminuser.
The following example shows the section ofsystem-jazn-data.xmlwith the encryptedcredentialsentry in boldface type:
jazn.com . . . oc4jadmin OC4J Administrator OC4J Administrator {903}4L50lHJWIFGwLgHXTub7eYK9e0AnWLUH - Replace the existing encrypted password with the new password.
Be sure to prefix the password with an exclamation point (!). For example:
!mynewpassword123The password for theoc4jadminuser should conform to following guidelines:
- Must contain at least five characters, but not more than 30 characters.
- Must begin with an alphabetic character. It cannot begin with a number, the underscore (_), the dollar sign ($), or the number sign (#).
- At least one of the characters must be a number.
- Can contain only the following characters; numbers, letters, and the following special characters: US dollar sign ($), number sign (#), or underscore (_).
- Cannot contain any Oracle reserved words, such as VARCHAR.
See Also:"The oc4jadmin User and Restrictions on its Password" in the Oracle Application Server Installation Guide
- Must contain at least five characters, but not more than 30 characters.
- Delete cached password data by deleting the contents of the following directory:
(UNIX) ORACLE_HOME/j2ee/oc4jinstance /persistence/ascontrol/ascontrol/securestore/ (Windows) ORACLE_HOME\j2ee\oc4jinstance\persistence\ascontrol\ascontrol\securestore/ - Start OC4J and the Application Server Control.
After the restart, the Application Server Control will use your new Administrator (oc4jadmin) password, which will be stored in encrypted format within thesystem-jazn-data.xmlfile.
Oracle BI EE 10.1.3.3/2 – Multi User Development of Repositories (MUD)
I had some time today to put together a simple document for enabling Multi-User Development(MUD) for repositories. Typically when you have many data sources and lots of tables, it would make sense to distribute the repository development work to multiple users. MUD is basically a feature of the BI EE admin tool wherein multiple users can work on the repository at the same time. The concept of Repository Merging was actually introduced in order to facilitate MUD. Lets try to understand the concept of MUD today.
Lets start with the simple diagram below.
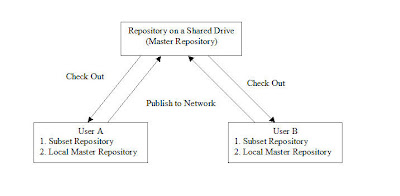
The above diagram illustrates how the MUD works. In order for the MUD to work following are the pre-requisites
1. A shared drive to host the Master Repository
2. All the client machines should have access to the master repository.
3. All the client machines should have the admin tool installed.
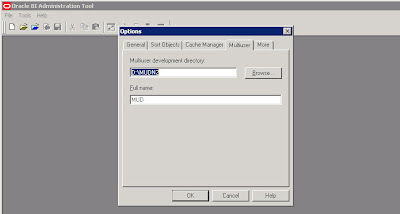
For the MUD to work, the repository that is worked upon by all the users should be kept in a shared directory. This shared directory should be accessible to all the users. In each of the client’s Admin tool, enter the Shared Directory path.
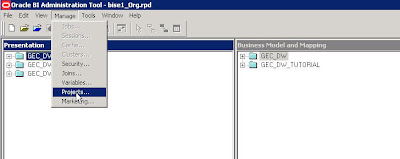
Now, open the Master repository in offline mode. The entire concept of MUD revolves around objects called as Projects. So, from within the Admin tool navigate to Manage – Projects.
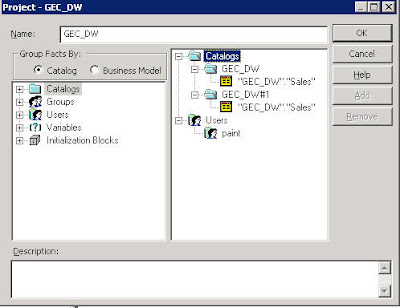
This will open up a project window. Projects are basically subsets of objects within the Admin tool that can be assigned to individual users. So, the idea is to assign different projects to different users. Also, each of these projects can contain one or more Logical Fact tables. As soon as a logical fact table is included all the other dependent objects would automatically be part of the project. Typically when we start with a repository, we would not be having any BM or presentation layers. So, it is recommended that one imports all the physical tables and creates the physical joins in the repository first before implementing MUD. After that we can create dummy BM and presentation layers so that they can be assigned to individual projects. Also, one can assign Users, Init Blocks and Variables to a project.
After creating and assigning objects to a project, the next step is to save the master repository in a shared drive. Now, open up a client Admin tool and navigate to File – Multiuser – Checkout. This Check out process does 2 things
1. Copies the Master repository from the shared drive to the local drive ( This will serve as the local master repository).
2. Gives you a screen to choose the project that you have the authority to work on.
3. Creates a subset repository (would ask you to enter the name) which would contain only the selected project related data.
So, basically the idea is to work on the subset repository (like creating/deleting dimensions, hierarchies etc) and then merge the changes back to the local master repository. The merge process will lock the master repository in the shared drive. In order to release the lock one would have to Choose “Publish to Network” which will copy the modified and merged local master repository to the shared drive. The process would be the same for all the other users.
Lets start with the simple diagram below.
The above diagram illustrates how the MUD works. In order for the MUD to work following are the pre-requisites
1. A shared drive to host the Master Repository
2. All the client machines should have access to the master repository.
3. All the client machines should have the admin tool installed.
For the MUD to work, the repository that is worked upon by all the users should be kept in a shared directory. This shared directory should be accessible to all the users. In each of the client’s Admin tool, enter the Shared Directory path.
Now, open the Master repository in offline mode. The entire concept of MUD revolves around objects called as Projects. So, from within the Admin tool navigate to Manage – Projects.
This will open up a project window. Projects are basically subsets of objects within the Admin tool that can be assigned to individual users. So, the idea is to assign different projects to different users. Also, each of these projects can contain one or more Logical Fact tables. As soon as a logical fact table is included all the other dependent objects would automatically be part of the project. Typically when we start with a repository, we would not be having any BM or presentation layers. So, it is recommended that one imports all the physical tables and creates the physical joins in the repository first before implementing MUD. After that we can create dummy BM and presentation layers so that they can be assigned to individual projects. Also, one can assign Users, Init Blocks and Variables to a project.
After creating and assigning objects to a project, the next step is to save the master repository in a shared drive. Now, open up a client Admin tool and navigate to File – Multiuser – Checkout. This Check out process does 2 things
1. Copies the Master repository from the shared drive to the local drive ( This will serve as the local master repository).
2. Gives you a screen to choose the project that you have the authority to work on.
3. Creates a subset repository (would ask you to enter the name) which would contain only the selected project related data.
So, basically the idea is to work on the subset repository (like creating/deleting dimensions, hierarchies etc) and then merge the changes back to the local master repository. The merge process will lock the master repository in the shared drive. In order to release the lock one would have to Choose “Publish to Network” which will copy the modified and merged local master repository to the shared drive. The process would be the same for all the other users.
Oracle BI EE 10.1.3.3/2 – Changing Administrator Passwords – Impact on BI Scheduler and BI Publisher – Understanding Impersonation
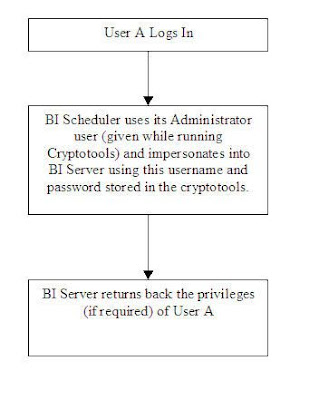
Another common question that keeps circulating in the mailing lists is “How do we ensure that changing Administrator password in BI Server does not impact BI Scheduler or BI Publisher?”. In order to answer this question we need to first understand how the integration between BI Scheduler and BI Server, and BI Publisher and BI Server works. Lets first start with BI Scheduler and BI Server. As you would probably know, BI Server repository contains all the users. Whenever we configure BI Scheduler, we would have to create a BI Scheduler administrator user, by running the cryptotools utility. This user (should be an user within the repository who is part of the Administrators group) details like username and password would be stored in the credentialstore.xml file. So, whenever any user logs into delivers and tries creating a schedule, then BI scheduler uses the user details stored inside the credentialstore.xml file to authenticate/impersonate into the BI Server. Once authenticated by the impersonation user, then the corresponding logging in user’s privilege details are returned back from the BI Server. This is explained in the below diagram
Now, what would happen when we change the Administrator user password in the repository? When we change the Administrator user password in the repository, the crendialstore.xml file would still contain the older password. Hence, whenever any user tries to run a schedule using the BI Scheduler, he would not be able to do so since BI Scheduler will still be using the older password of the Administrator user. So, in order to keep both the passwords in sync one would have to run the cryptotools utility again with the new password as sepecified in the repository.
The integration between BI Server and BI Publisher also works using the same logic. But the general confusion is why do we have to run the cryptotools? By default when we install BI EE, the cryptotools utility would automatically be run for the Administrator user for BI Publisher. But this is not the case for BI Scheduler. Hence, we would have to manually run the cryptotools for scheduler to bring it up.
As shown, whenever the password for the Administrator user alone is changed, then and only then should the cryptotools be run again. For all other users, there is no need for running the cryptotools. For example, lets try changing the password for Administrator in the repository to say “welcome1″. Once that is done, we need to run the cryptotools twice. One for the admin role (used by Bi Scheduler) and the other for the bipublisheradmin role (used by BI Publisher). Run the cryptotools with the new password.
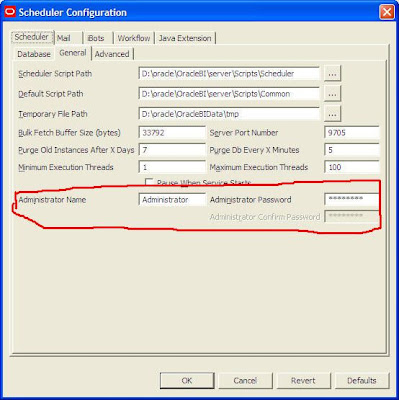
Also, open up the Job Manager and update the Administrator Password there.
Similarly, run it for BI Publisher using the bipublisheradmin alias.
The next step is to go to {OracleBI}\xmlp\XMLP\Admin\Configuration and open up the xmlp-server-config.xml. Update the Administrator passwords here.
Then restart Presentation Services, BI Scheduler Service and OC4J. This would sync up all the passwords.
Now, what would happen when we change the Administrator user password in the repository? When we change the Administrator user password in the repository, the crendialstore.xml file would still contain the older password. Hence, whenever any user tries to run a schedule using the BI Scheduler, he would not be able to do so since BI Scheduler will still be using the older password of the Administrator user. So, in order to keep both the passwords in sync one would have to run the cryptotools utility again with the new password as sepecified in the repository.
The integration between BI Server and BI Publisher also works using the same logic. But the general confusion is why do we have to run the cryptotools? By default when we install BI EE, the cryptotools utility would automatically be run for the Administrator user for BI Publisher. But this is not the case for BI Scheduler. Hence, we would have to manually run the cryptotools for scheduler to bring it up.
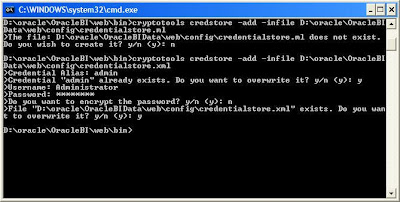
As shown, whenever the password for the Administrator user alone is changed, then and only then should the cryptotools be run again. For all other users, there is no need for running the cryptotools. For example, lets try changing the password for Administrator in the repository to say “welcome1″. Once that is done, we need to run the cryptotools twice. One for the admin role (used by Bi Scheduler) and the other for the bipublisheradmin role (used by BI Publisher). Run the cryptotools with the new password.
1 | cryptotools credstore -add -infile D:\oracle\OracleBIData\web\config\credentialstore.xml |
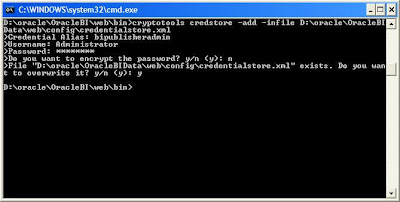
Similarly, run it for BI Publisher using the bipublisheradmin alias.
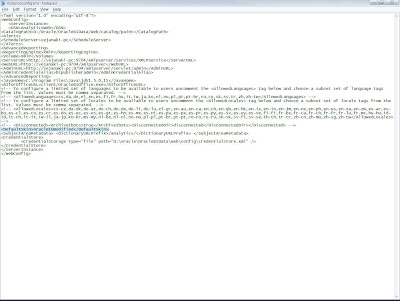
The next step is to go to {OracleBI}\xmlp\XMLP\Admin\Configuration and open up the xmlp-server-config.xml. Update the Administrator passwords here.
01 | <?xml version="1.0" encoding="UTF-8"?> |
02 | <xmlpConfig xmlns="<a href="http://xmlns.oracle.com/oxp/xmlp">http://xmlns.oracle.com/oxp/xmlp</a>"> |
03 | <property name="SAW_SERVER" value="vejanaki-lap"/> |
04 | <property name="SAW_SESSION_TIMEOUT" value="90"/> |
05 | <property name="DEBUG_LEVEL" value="exception"/> |
06 | <property name="SAW_PORT" value="9704"/> |
07 | <property name="SAW_PASSWORD" value="welcome1"/> |
08 | <property name="SAW_PROTOCOL" value="http"/> |
09 | <property name="SAW_VERSION" value="v4"/> |
10 | <property name="SAW_USERNAME" value="Administrator"/> |
11 | <property name="SAW_URL_SUFFIX" value="analytics/saw.dll"/> |
12 | <property name="SECURITY_MODEL" value="BI_SERVER"/> |
13 | <property name="BI_SERVER_SECURITY_DRIVER" value="oracle.bi.jdbc.AnaJdbcDriver"/> |
14 | <property name="BI_SERVER_SECURITY_URL" value="jdbc:oraclebi://vejanaki-lap:9703/"/> |
15 | <property name="BI_SERVER_SECURITY_ADMIN_USERNAME" value="Administrator"/> |
16 | <property name="BI_SERVER_SECURITY_ADMIN_PASSWORD" value="welcome1"/> |
17 | </xmlpConfig> |
Oracle 10g/11g – OLAP, CUBE and ROLLUP
If you had gone through the list of features in Oracle 11g, one of the most important advancements/features in the BI space would be the introduction of Oracle OLAP as part of the DB optimizer (in the form of MV query rewrite). But for users who do not have the luxury of using Oracle OLAP 11g (or even 11g database) in their environment, dont lose hope yet  . CUBE and ROLLUP functions had undergone quite a few advancements in themselves while in 10g itself and they can indeed mimic an OLAP cube starting from 10g. Let me just give an example here. All the advances done in CUBE and ROLLUP functions are documented here. If you had gone through my previous blog entry here on using OLAP 11g, i had used a specific example to create a cube. I would be using the same one here.
Dimensions:
Customers:
Hierarchy: All -> Customer Gender -> Customer Name
Product:
Hierarchy: All -> Product Pack Size -> Product Name
Times:
Hierarchy: All -> Fiscal Year -> Fiscal Month -> Fiscal Day
Measures:
Quantity Sold
Amount Sold
Oracle 10g/11g now supports Hierarchical cubes within queries. As you would know, ROLLUP is a feature wherein one can have summed up data across a hierarchy. What is new in 10g & 11g is, one can have multiple ROLLUPs (more like hierarchies) in the group by clause which in turn would take a cartesian product of all the rollups in the group by clause. In order to get a cube like data for the above measures and dimensions, the query would look like this
SELECT CUST_GENDER, CUST_FIRST_NAME||CUST_LAST_NAME, PROD_PACK_SIZE, PROD_NAME, FISCAL_YEAR, FISCAL_MONTH_DESC, DAY_NAME, SUM(QUANTITY_SOLD) AS QUANTITY, SUM(AMOUNT_SOLD) AS SALES
FROM
SALES a, CUSTOMERS b, PRODUCTS c, TIMES d
where
a.CUST_ID = b.CUST_ID and
a.PROD_ID = c.PROD_ID and
a.TIME_ID = d.TIME_ID
GROUP BY
ROLLUP(CUST_GENDER, CUST_FIRST_NAME||CUST_LAST_NAME),
ROLLUP(PROD_PACK_SIZE, PROD_NAME),
ROLLUP(FISCAL_YEAR, FISCAL_MONTH_DESC, DAY_NAME)

And the plan for the above query would be like this

The above generates the same set of data that Oracle OLAP produces. But of course, oracle OLAP provides more features like partitioning and many more. This is just to kindle your interest on the enhancements that have been made in this space. If you want to create a MV,
CREATE MATERIALIZED VIEW SALES_ROLLUP_MV
ENABLE QUERY REWRITE AS
SELECT CUST_GENDER, CUST_FIRST_NAME||CUST_LAST_NAME as CUSTOMER_NAME, PROD_PACK_SIZE, PROD_NAME, FISCAL_YEAR, FISCAL_MONTH_DESC, DAY_NAME, SUM(QUANTITY_SOLD) AS QUANTITY, SUM(AMOUNT_SOLD) AS SALES
FROM
SALES a, CUSTOMERS b, PRODUCTS c, TIMES d
where
a.CUST_ID = b.CUST_ID and
a.PROD_ID = c.PROD_ID and
a.TIME_ID = d.TIME_ID
GROUP BY
ROLLUP(CUST_GENDER, CUST_FIRST_NAME||CUST_LAST_NAME),
ROLLUP(PROD_PACK_SIZE, PROD_NAME),
ROLLUP(FISCAL_YEAR, FISCAL_MONTH_DESC, DAY_NAME)
The above is called as a hierarchical cube. It does not store all the combinations like in a cube. Instead it stores the rollup of data in the same hierarchy across different hierarchies. For example, this cube will not generate value for sales when sales is analyzed by Customer Name, Product name and Fiscal month since their actual path in the hierarchy is not specified.
If one wants to generate an actual cube, the query would look like this
SELECT CUST_GENDER, CUST_FIRST_NAME||CUST_LAST_NAME, PROD_PACK_SIZE, PROD_NAME, FISCAL_YEAR, FISCAL_MONTH_DESC, DAY_NAME, SUM(QUANTITY_SOLD) AS QUANTITY, SUM(AMOUNT_SOLD) AS SALES
FROM
SALES a, CUSTOMERS b, PRODUCTS c, TIMES d
where
a.CUST_ID = b.CUST_ID and
a.PROD_ID = c.PROD_ID and
a.TIME_ID = d.TIME_ID
GROUP BY
CUBE(CUST_GENDER, CUST_FIRST_NAME||CUST_LAST_NAME),
CUBE(PROD_PACK_SIZE, PROD_NAME),
CUBE(FISCAL_YEAR, FISCAL_MONTH_DESC, DAY_NAME)
The above does not take care of best practices to create MVs or the queries. But this is just to show the advancements that 10g/11g provides for an end user. Can anyone let me know whether these were available in 9i? I believe in 9i, correct me if i am wrong here, one would not be able to create MVs out of the queries using CUBE clause.
Oracle BI Publisher and BI EE – Invisible Admin Tab!!!
I had a couple of users today who had sent me an email informing me about a strange issue while installing BI EE. Call it coincidence, we had the same question pop up in the forums today as well. I do not have a complete solution to this problem yet. But i thought this is worthwhile to blog about since there are chances that other users might come across a similar issue. The problem was, after the default install of 10.1.3.3.1/0(using OC4J), the users are unable to perform any kind of administration on BI Publisher. i.e if they log into BI Publisher as Administrator, they do not see the “Admin” tab!!!. There can be multiple reasons why this can happen. But following should give you a general set of guidelines on where to look at to see where the source of the problem is.
When you install BI EE, the BI Publisher that also gets installed would be configured to use BI Server security. So, in order to access BI Publisher you need to ensure that BI Server and the Presentation Services(if you want reports from Answers as data source) are up and running. There are 3 different files that are worth a mention here.
1. {OracleBI}\xmlp\XMLP\Admin\Configuration\xmlp-server-config.xml
2. {OracleBI}\xmlp\XMLP\Admin\Security\principals.xml
3. {oc4j_bi}\j2ee\home\applications\xmlpserver\xmlpserver\WEB-INF\xmlp-server-config.xml
Now, each of these files store certain parameters that would be used in the security and also in identifying the reports. So, if you have an install where your BI Publisher does not show you the Admin tab, try to check the following.
1. Open the file {OracleBI}\xmlp\XMLP\Admin\Configuration\xmlp-server-config.xml using a text editor. Go to {OracleBI}\xmlp\XMLP\Admin\Configuration\xmlp-server-config.xml. Check whether you have SUPERUSER_PASSWORD and SUPERUSER_USERNAME set. Also check whether SECURITY_MODEL property is properly set.

Edit the property SECURITY_MODEL and change it to XDO. i.e. for example <property name=”SECURITY_MODEL” value=”XDO”/>. This would basically change the security model from BI Server security to BI Publisher Security.
2. Restart OC4J and see whether you are able to log in as Administrator and see the Admin tab. If you are able to see the Admin tab then there is some problem with BI Publisher not being able to connect to BI Presentation Services in order to leverage the security. By default, when we install BI EE, BI Publisher would use BI Server security. By changing it to XDO we are making it to leverage local BI Publisher security instead of BI EE security. In the {OracleBI}\xmlp\XMLP\Admin\Configuration\xmlp-server-config.xml, try placing the ip instead of the hostname. For example, <property name=”BI_SERVER_SECURITY_URL” value=”jdbc:oraclebi://vejanaki-pc:9704/”/>. Default install will take the hostname and in some cases BI Publisher does not seem to recognize the hostname.
3. Go to {OracleBI}\xmlp\XMLP\Admin\Security\principals.xml. Check whether you the Administrator Role mapping is enabled there.
The above are some checks that should get you started. If others have any other comments feel free to post them here. In the meantime, i am off for a mini vacation to celebrate the festival of lights!!!. Should be back next week with more posts.
When you install BI EE, the BI Publisher that also gets installed would be configured to use BI Server security. So, in order to access BI Publisher you need to ensure that BI Server and the Presentation Services(if you want reports from Answers as data source) are up and running. There are 3 different files that are worth a mention here.
1. {OracleBI}\xmlp\XMLP\Admin\Configuration\xmlp-server-config.xml
2. {OracleBI}\xmlp\XMLP\Admin\Security\principals.xml
3. {oc4j_bi}\j2ee\home\applications\xmlpserver\xmlpserver\WEB-INF\xmlp-server-config.xml
Now, each of these files store certain parameters that would be used in the security and also in identifying the reports. So, if you have an install where your BI Publisher does not show you the Admin tab, try to check the following.
1. Open the file {OracleBI}\xmlp\XMLP\Admin\Configuration\xmlp-server-config.xml using a text editor. Go to {OracleBI}\xmlp\XMLP\Admin\Configuration\xmlp-server-config.xml. Check whether you have SUPERUSER_PASSWORD and SUPERUSER_USERNAME set. Also check whether SECURITY_MODEL property is properly set.
Edit the property SECURITY_MODEL and change it to XDO. i.e. for example <property name=”SECURITY_MODEL” value=”XDO”/>. This would basically change the security model from BI Server security to BI Publisher Security.
2. Restart OC4J and see whether you are able to log in as Administrator and see the Admin tab. If you are able to see the Admin tab then there is some problem with BI Publisher not being able to connect to BI Presentation Services in order to leverage the security. By default, when we install BI EE, BI Publisher would use BI Server security. By changing it to XDO we are making it to leverage local BI Publisher security instead of BI EE security. In the {OracleBI}\xmlp\XMLP\Admin\Configuration\xmlp-server-config.xml, try placing the ip instead of the hostname. For example, <property name=”BI_SERVER_SECURITY_URL” value=”jdbc:oraclebi://vejanaki-pc:9704/”/>. Default install will take the hostname and in some cases BI Publisher does not seem to recognize the hostname.
3. Go to {OracleBI}\xmlp\XMLP\Admin\Security\principals.xml. Check whether you the Administrator Role mapping is enabled there.
The above are some checks that should get you started. If others have any other comments feel free to post them here. In the meantime, i am off for a mini vacation to celebrate the festival of lights!!!. Should be back next week with more posts.
Subscribe to:
Posts (Atom)