Saturday, 30 April 2011

Oracle BI EE 10.1.3.3/2 – Level Based Measures (LBMs)

Now that i am back from quite a good weekend, i thought i would blog about something which is pretty interesting i.e. Level based Measures. Lets try to understand this first. This is what the documentation has got to say about this “A level-based measure is a column whose values are always calculated to a specific level of aggregation. For example, a company might want to measure its revenue based on the country, based on the region, and based on the city. You can set up columns to measure CountryRevenue, RegionRevenue, and CityRevenue. “ As stated above Level based measures have their aggregation set based on a level in the hierarchy. Lets try to understand this using a simple example. We will start with a simple hierarchy as shown below.
      
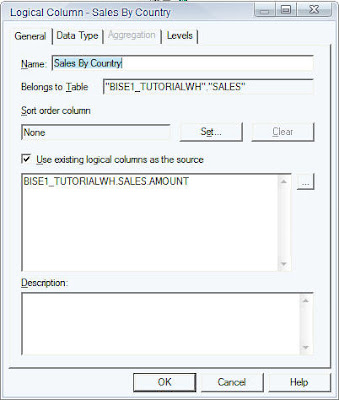
Basically, we have a hierarchy and we would like to have the Sales measure aggregated over 3 levels i.e. Total Level, Region Level and the Country level. Now lets start with creating 3 logical measure columns Sales By Region, Sales By Country and Total Sales. Easch of these measures are exact replica of the Sales Measure which has a default aggregation of SUM.


Now, in order to make the 3 columns to aggregate over Region, Country and Total levels just drag and drop the corresponding columns to their associated levels as shown below.
      
Now, try creating a report with all the 4 columns(including the base SUM aggregated Sales measure) and see what happens.
      
As shown above what happens is Sales By Country calculates the sales across all the countries. Sales By Region calculates the sales across all the regions. And Total sales gives total sales across all the regions and countries. But you would see a lot of line items because of the granularity at which the Sales By Country Works. Since there are 17 different countries you would see 17 different line item sums. Now, if you remove the Sales By Country column the number of line items gets reduced to the number of regions i.e. 5
      
This could be a lot useful in situations where you want to a division of different LBM’s for example, Sales By Region/Sales By Country

Oracle BI EE 10.1.3.3/2 – Automating Password Updates of Connection Pools and Users – Command Line Options

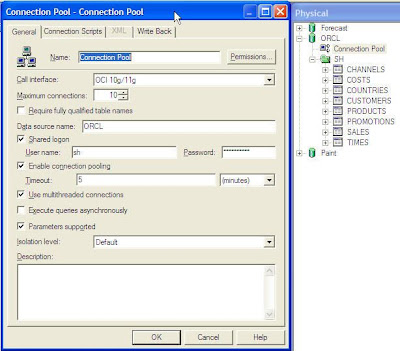
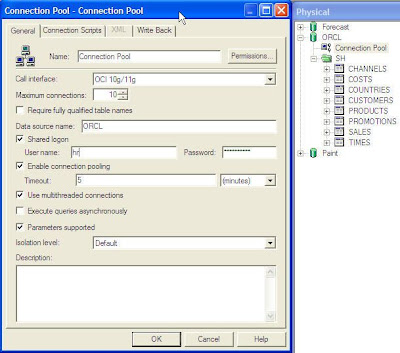
If you had gone through my blog entry here, i would have talked about using UDML as a way for automating migration from dev to test/prod environments. But the major problem with UDML is that one cannot update the passwords of Connection Pools, Users etc since the UDML expects them to be encoded. In such a case, for updating passwords alone we can use an undocumented command line switch option for the AdminTool. For example, look at the screenshot below.
    
This is nothing but the connection Pool property of the ORCL database. Here, we would like to change the schema names and its corresponding passwords. For example, we would like to change the schema to SH and also would like to change the password. In order to do that, open a text editor and enter the below command. Save the file in the same directory as the Admin Tool ({OracleBI}\Server\Bin). If not, then you would have to give the full path of the file.
1Open Dev_Machine.rpd Administrator Administrator
2SetProperty "Connection Pool" "orcl"."Connection Pool" "User" "sh"
3SetProperty "Connection Pool" "orcl"."Connection Pool" "Password" "welcome1"
4Save
5Exit
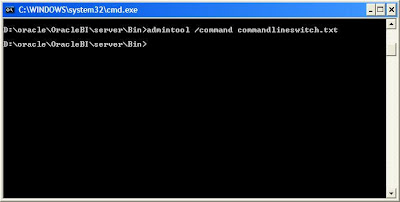
Now, open up a command prompt and navigate to {OracleBI}\Server\Bin. Typein in the below command,
1admintool /command commandlineswitch.txt
    
This would automatically update the connection pool values.
    
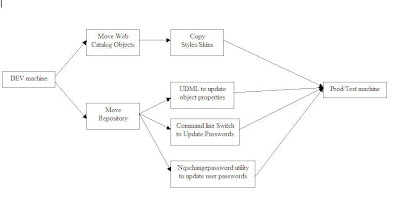
You can use the above to update many objects within the repository. For updating passwords for users, just use the nqschangepassword.exe tool. For more details on this, check my blog entry here. So, on a high level your entire migration process would look as shown below
    
Thanks to Phil for sharing this.

Oracle BI EE 10.1.3.3/2 – Customizing Login Screen

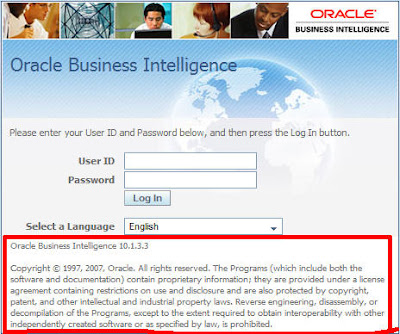
I thought of picking up an older forum question for my blog entry today. The question is how do we go about customizing BI EE login screen? BI EE login screen primarily works (from the UI perspective) using the following style, stylesheets and XML messages.
1.   Logon.css – Stylesheet that sets the font sizes, background color etc
2.   LogonControlMessages.xml
3.   LogonMessages.xml
4.   ProductMessages.xml
5.   Utilmessages.xml
6.   sk_oracle10 – Base skin which provides the images for the login screen.
The login image of the login screen comes from the bglogon.jpg (this would be present in your base skin i.e {OracleBI}\web\app\res\sk_oracle10\b_mozilla_4.
      
In order to modify the above image, just create a new skin and put a new image under the same name as bglogon.jpg. For creating a new skin, check my blog entry here
The word Oracle Business Intelligence comes from the kmsgProductGeneral message in ProductMessages.xml (This file would be under {OracleBI}\web\msgdb\l_en\messages )
      
“Please enter your User ID and Password below, and then press the Log In button.” – This comes from kmsgAuthenticateRequestedContentRequiresLogon message of the logonmessages.xml (This file is present under {OracleBI}\web\msgdb\l_en\messages ).
      
The UserID, Password and the Login button all come from a message called kmsgLogonLanguageForm in logoncontrolmessages.xml (This file would be present under {OracleBI}\web\msgdb\messages).
      
Lastly the copyright messages come from the message kmsgNQuireLegalCopyright in utilmessages.xml (This file would be present under {OracleBI}\web\msgdb\l_en\messages).
      
In order to customize these messages check my blog entry here and here. Just a word of note: Some images like “Powered By Oracle” logo should not be modified since they would violate the license agreement. The above should give you an idea of the list of messages/images that you need to modify to get your desired customization.

Oracle BI EE 10.1.3.3/2 – Using LDAP/OID Authentication

One of the very good features of OBI EE 10.1.3.3/2 is its ability to leverage OID/LDAP authentication. I was trying this one out today and thought i would document it. I would split this into 2 articles. In this article we will see how to setup the OID authentication. In the next article we would see how to pass on group credentials to users from OID. Lets go through the steps one by one.
1.   Open the repository in Online Mode using the Administrator. Go to Manage and click on Security. Click on Action–New–LDAP Server
      
2.   Enter the Oracle Internet Directory details like hostname and the Base DN. And test the connection.
      
      
3.   Right click on the LDAP server and click on import. You should be seeing the users that are under OID.
      
4.   Once this is done, the next step is to create an initialization block that would basically use the OID server created above and set a system session variable called USER. This USER variable would be used during authentication.
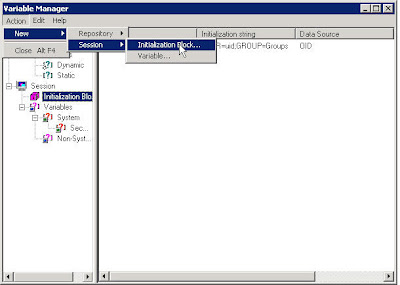
Go to Manage->Variables to open up the variable manager. Click on Action->New->Sesion->Initialization Block
      
Enter any name, say OID, and click on edit data source. Select the OID/LDAP server that we created in the 1st 3 steps. Then click on edit target and click on new variable. Enter USER as the name of the variable and click ok.
      
Edit the variable and add the uid as the LDAP variable.
      
Test the initialization block as orcladmin.
      
You must see orcladmin username set for the USER variable. If you see that then steps that you have done so far are correct. Remember to set the Required for Authentication check box.
      
Check in the changes and save the repository. Log into Answers as orcladmin. We should be able to see all the public dashboards.
      
This is the first step in enabling authentication. The next step is to get the group related info from the OID and assign it to the user which we will see in a later article.

Customizing OBI EE – GO URL Parameters

While I was working on the data mining pieces, I got a request from a customer who basically wanted to completely customize OBI EE. Well, it got me thinking about the various customization options that we have with OBI EE. In my customer’s case, they wanted to integrate OBI EE into their web application. Let’s see what options we have with OBI EE customizations.
Using OBI EE GO URL parameters
Almost most of the functionality that a customer would need or expect out of OBI EE is available for them via URL parameters. One can leverage these URL parameters into their application. What this would do is that rather than having OBI EE as a separate reporting tool, it would enable an end customer to call various reports via iframes into their application.

 A sample URL with the parameters for OBI EE would look like this
 http://hostname:port/analytics/saw.dll?GO&NQUser=Administrator&NQPassword=Administrator&
Path=/Users/administrator/GEC_DW/Regional+Sales/Profit+per+Category+Pie+Chart&Options=md

When one needs to use the URL parameters the fundamental part of the URL should include http://hostname:port/analytics/saw.dll?GO and following that options are to be entered. Lets look at the various URL parameters for OBI EE
        1. &NQUser – Username for logging into Answers
        2. &NQPassword – Password for login. One must realize that entering password directly into the URL is not very secure. Its recommended to use    the post method wherein the password is not explicitly shown. (People who know discoverer, entering password, as a parameter is no more   available. Only post method is supported)

        3. &Options=mdfr – Each of the letters in mdfr have a specific function.
            m - To include the modify report link under the report
            d - To include the download link under the report
            f - To include the printer friendly link under the report
            r - To include the refresh report link under the report
  All the above can be interchangeably used. For example &Options=md for including modify and download links alone.
        4. &Action – This allows the developers to request specific formats for the reports. For example, &Action=print (can also have excel etc)

        5. &ViewName – This argument allows one to specify a view. For example, &ViewName=Chart1
        6. &Style – Specify a style sheet For example, &Style=Lime
        7. &Format – Specify the format of the output, html or xml

        8. &Path – Specify the path for the report. For example, &Path=/Shared/administrator/testReport
        9. &SQL – Logical Sql – One can even issue logical sql via the URL parameter. For example,  &SQL=select+region+from+Sales. Here Sales is the   subject area.
The above are some of the parameters that you might find useful. But for more detailed and some parameters refer the Documentation here.
 
The above picture is actually a simple application that calls out 2 different reports based on the data entered. This kind of integration is very strong and infact the entire OBI EE is integrated into the Oracle Siebel CRM using this methodology. One can use Post methods; execute scripts etc using this type of methodology.
Following are some examples for simple HTML form elements using post method.
 Access to Answers:
     <form action=”http://hostname:port/analytics/saw.dll?” method=”post”>
     <input type=”hidden” name=”Cmd” value=”Answers”>
     <input type=”hidden” name=”nqUser” value=”Administrator”>
     <input type=”hidden” name=”nqPassword” value=”Administrator”>
     <input type=”submit” value=”Answers”>
     </form>
To open a report in Answers (for edit), include the Path parameter:
     <form action=”http://hostname:port/analytics/saw.dll?” method=”post”>
     <input type=”hidden” name=”Cmd” value=”Answers”>
     <input type=”hidden” name=”nqUser” value=”Administrator”>
     <input type=”hidden” name=”nqPassword” value=”Administrator”>
     <input type=”hidden” name=”Path” value=”/Shared/SH/Category analysis”>
     <input type=”submit” value=”Open a Report for editing in Answers”>
     </form>
To open BI Publisher use “AdvancedReports” as the Cmd value
     <form action=”http://hostname:port/analytics/saw.dll?” method=”post”>
     <input type=”hidden” name=”Cmd” value=”AdvancedReports”>
     <input type=”hidden” name=”nqUser” value=”Administrator”>
     <input type=”hidden” name=”nqPassword” value=”Administrator”>
     <input type=”submit” value=”BI Publisher”>
     </form>
 

Oracle BI EE 10.1.3.3 – Configuring Delivers – iBots

I had one OBI EE user today who had specifically asked about configuring iBots. Though it is pretty straight forward, the customer was looking out for a screenshot by screenshot tutorial on how to go about setting delivers. Well, i had some time to put this one together. Hopefully, you would find it of some use.
1.   The first step is to configure a schema that would hold all our scheduler tables. If you do not have a schema create or use an existing one. In my case i have a schema called S_NQ_SCHED wherein i would create all my scheduler tables.
2.   Navigate to your {ORACLEBI}/Server/Schema folder and run the scheduler scripts. If you are on an Oracle Database, you would have to run SAJOBS.Oracle.sql. This would basically create the scheduler tables that Oracle Delivers would use later.
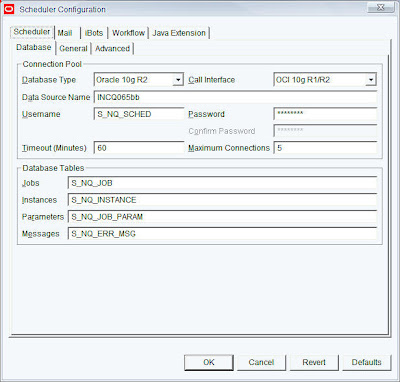
3.   The next step is to open your Job Manager. Go to File – > Configuration Options and enter the schema and connection details for the scheduler schema. In my case it would be S_NQ_SCHED schema.
      
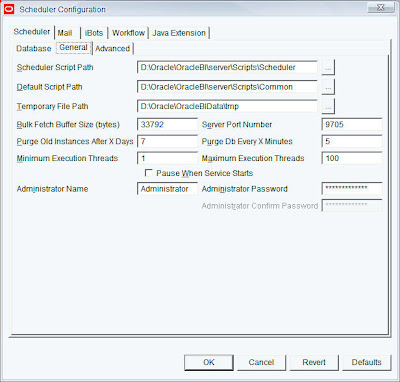
4.   Go to the General tab. If you had followed the default install, then leave everything the same. Just enter in the Administrator usernames and passwords.
   
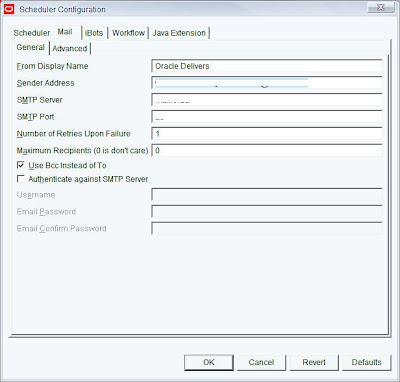
5.   Go to the Mail tab and enter in your mail server details.
      
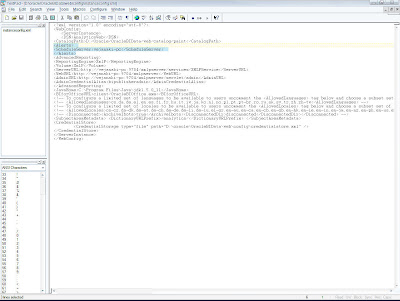
6.   Open your instanceconfig.xml and add in the scheduler details. This step basically lets the presentation server know about the machine and port details of the scheduler. By default the scheduler port is 9705.
      
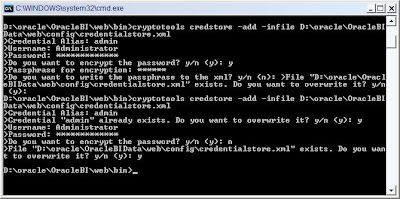
7.   The next step is to run a cryptotools utility that would basically store the username and password of the scheduler into an XML file called credentialstore.xml.
8.   Go to {OracleBI}/web/bin from command prompt. Then enter in the following command.
cryptotools credstore -add -infile OracleBIData_HOME/web/config/credentialstore.xml
   
Ensure that you have the alias as “Admin”.
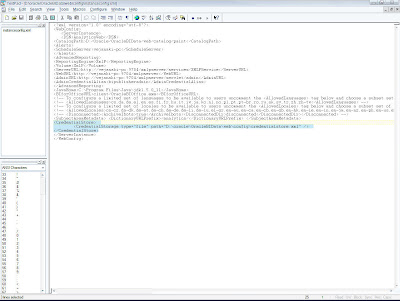
9.   The next step is to add the details of this credentialstore.xml file into the instanceconfig.xml.
   
Once this is done you should be able to schedule and create new ibots. The best and quick way to check whether the configuration has been done properly is to save a sample ibot. If you are able to properly save one then your configuration has been properly set. For more details refer the docs here.

Oracle BI EE 10.1.3.3/2 – Write Back Option – Budgeting/Planning

OBI EE has another interesting feature that would allow end users to update or insert data back into the database. For example, one can have a column of data that can be manually entered by end users, which in turn can be updated back to the database. This would make a lot of sense for users who want to do planning or budgeting on a mini scale. They can use OBI EE both as a reporting tool and also partly for entering sales quotas or budgets etc depending on how the business is performing currently. Let us see how to go about setting up this option in OBI EE. The entire process of setting this up involves changes right from the connection pool to the presentation layer. The example that i am going to follow here is based on the data from SH schema. I have added a new column called Sales_Quota to the sales table which is what i would like to update and insert. The idea is to allow end users to enter data for sales_quota and insert new records into the database.
      
1.   The first step is to enter in the relevant details in the connection pool writeback properties section. If you are on Oracle, leave them as default.
      
2.   The second step is to make the sales table not cacheable. This would ensure that we would get the results as and when we update or insert.
      
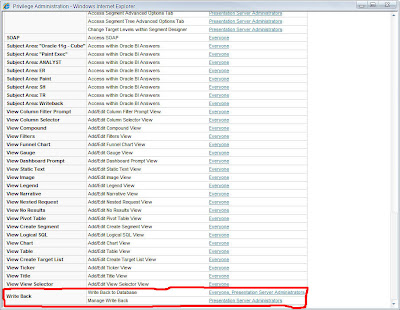
3.   Once this done, log into OBI EE Answer and give in the writeback privilege to those users who would need them. In my case, i would be giving them to Administrator since it is not enabled by default.
      
4.   Next is to create a sample report that would include the sales_quota column. I have a report with all the 5 dimension keys and sales_quota.
      
5.   Once this is done, go to the column properties of sales_quota and enable writeback.
      
6.   After enabling the write back, save the report. The next step is to specify the query that we would like the BI Server to execute while writing back to the database. The queries (insert and update) are specified in a XML Template.The XML Templates are generally placed in {ORACLEBI}/web/customMessages folder. The structure of my XML template file is


The filename of the XML file can be anything. But the WebMessage name is the actual XML template name i.e SHNEW is the XML Template name. One can have inserts as well as updates. @{cn-1} specifies the actual coulmns that i have pulled into the report.
7.   Go to the table properties of the report and click on the write back option. Enter in the template details.
      
      
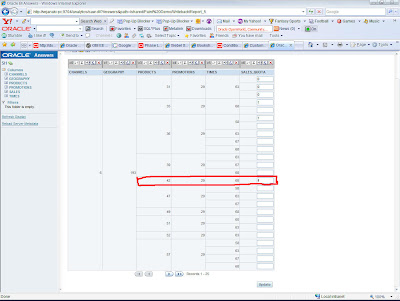
8.   Once this is done, enter in some data and test out the write back.
      
      
More details can be obtained from the BI Server and Presentation Services guides.